
Tutorial 1: Penetration Testing Lab – The Ultimate 3-Step Setup Guide

Lesson notes

Welcome to Tutorial 1 of the Ethical Hacking & Cybersecurity Masterclass. If you want to become a professional ethical hacker, you must build a penetration testing lab.
You cannot learn to hack by simply reading a book or watching a video. You can only learn to hack by hacking.
However, launching exploits against a live target on the internet without written permission is a felony. To learn safely and legally, you need a dedicated penetration testing lab — a controlled, isolated virtual environment where you play the role of both the attacker and the victim.
In this masterclass, our penetration testing lab will employ a hybrid target strategy:
- Infrastructure Target: We will use Metasploitable 2 to learn the classic, fundamental network vulnerabilities that still plague legacy systems today.
- Web Application Target: We will use bWAPP (buggy web application) deployed via the bee-box VM. bWAPP is a purposefully vulnerable, extremely realistic PHP application that looks and behaves exactly like the systems you will encounter in real enterprise engagements.
Let’s build your new penetration testing lab.
1. Penetration Testing Lab Architecture
Your penetration testing lab will exist entirely inside your host computer using virtualization software. You can use either Oracle VirtualBox or VMware Workstation for this task.
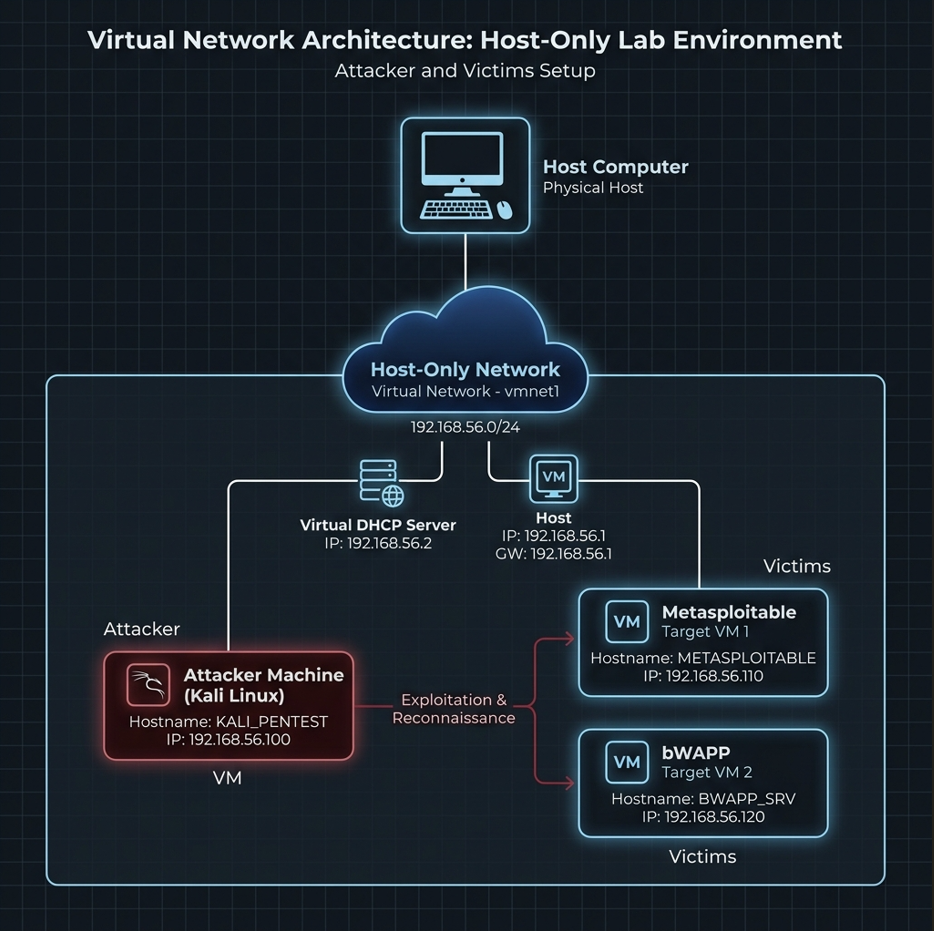
Why a Host-Only Network for a Penetration Testing Lab?
For a secure penetration testing lab, we must use a Host-Only Network. A Host-Only network creates a virtual switch that only connects the virtual machines (VMs) to each other and to your host machine. They cannot access the internet, and more importantly, the malware and aggressive network scans you run inside your penetration testing lab cannot escape and attack your home router or smart devices.
2. Setting Up the Penetration Testing Lab Network
To begin configuring your penetration testing lab, we need to create the isolated network.
If you use VirtualBox:
- Open VirtualBox. Go to File → Tools → Network Manager.
- Under the Host-Only Networks tab, click Create (if one doesn’t exist).
- It will usually be named
VirtualBox Host-Only Ethernet Adapter. - Check the properties: it should have an IP address like
192.168.56.1with a Mask of255.255.255.0. - Ensure the DHCP Server is enabled so the VMs in your penetration testing lab get IP addresses automatically.
If you use VMware Workstation:
- Open VMware. Go to Edit → Virtual Network Editor.
- Look for the adapter configured as Host-only (usually
VMnet1). - Ensure “Use local DHCP service to distribute IP address to VMs” is checked.
- Note the Subnet IP (e.g.,
192.168.220.0).
3. The Attacker: Kali Linux
No penetration testing lab is complete without the attacker machine. Kali Linux is a Debian-based Linux distribution funded and maintained by Offensive Security. It comes pre-installed with over 600 penetration testing tools.
Since you are likely already running Kali Linux locally as part of your general toolkit, we just need to reconfigure it for the penetration testing lab.
Step 1: Change the Network Adapter
- Power off your Kali VM.
- Go to VM
Unlock the Remaining 60%
Join the ONICastro Intelligence Hub — completely free.
Get full access to every tutorial and never lose your place.
- Learning Paths synced to your account
- Continue exactly where you stopped
- Completed badges & next recommended step
- Priority access to speedy consultancy